
Milkshake Recipe
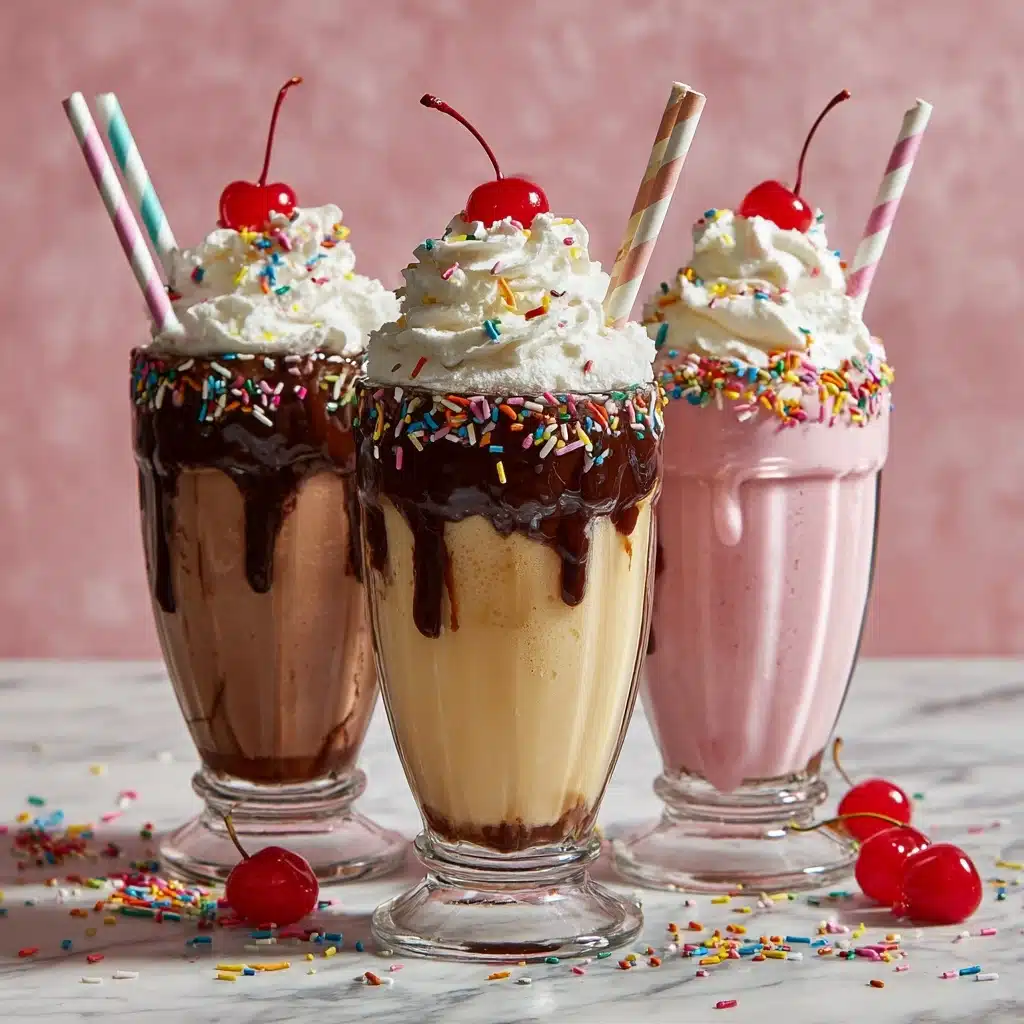
If you crave a creamy, dreamy treat that instantly turns any moment into a little celebration, this Milkshake Recipe will be your new best friend. With its classic vanilla base, infinite topping options, and super-quick prep time, you can blend up diner-worthy shakes at home in under ten minutes. Whether you’re after a nostalgia fix or introducing kids to that frothy, fizzy magic, this recipe is pure joy in a glass.
Ingredients You’ll Need
The beauty of this Milkshake Recipe lies in its simplicity—each staple ingredient is chosen to maximize flavor, create a velvety texture, and give your shake that picture-perfect, creamy white color. Don’t skip or swap them unless the urge strikes for flavor adventure!
- Vanilla ice cream: The iconic base, delivering creamy richness and a sweet, satisfying flavor—stick with a good-quality ice cream for the best results.
- Whole milk: This adds silkiness and helps blend everything together; whole milk makes it extra rich, but use any milk you love.
- Vanilla extract: One teaspoon coats the ice cream in deeper vanilla flavor, making your shake seriously crave-worthy.
- Whipped cream (optional): For that diner-style crown on top—don’t forget it if you’re looking for the full visual effect!
- Sprinkles or chocolate syrup (optional): These are your ticket to personalization and decadence; go wild or keep it classic.
How to Make Milkshake Recipe
Step 1: Add Ice Cream to the Blender
Kick things off by scooping about 2 cups (or 4 generous scoops) of vanilla ice cream into your blender. This ensures your milkshake is frosty, thick, and packed with creamy goodness right from the start.
Step 2: Pour in the Milk
Add 1 cup of cold milk into the blender with your ice cream. Whole milk is classic for richness, but feel free to substitute with almond, oat, or even skim milk depending on your mood or dietary needs.
Step 3: Add Flavorings
Drop in 1 teaspoon of vanilla extract to intensify that lovely vanilla aroma. Sticking to the classic? Great! But this is also the moment to sneak in chocolate syrup, strawberry extract, or any other mix-in if you’re feeling adventurous.
Step 4: Blend Until Smooth
Pop the lid on and blend on high speed for 30–60 seconds. You want the shake creamy and perfectly combined. Peek inside: if it’s too thick, a splash more milk will loosen things up, or add more ice cream if it’s not thick enough for your liking.
Step 5: Pour and Garnish
Pour your Milkshake Recipe into two tall, chilled glasses. Swirl with whipped cream, a zigzag of chocolate syrup, a flurry of sprinkles, or a scattering of crushed cookies—make it yours. Serve straight away with a straw and a spoon for optimal enjoyment!
How to Serve Milkshake Recipe

Garnishes
A true Milkshake Recipe experience is never complete without fun, eye-catching garnishes. Think mountains of whipped cream, chocolate syrup drizzles, rainbow sprinkles, or even crushed cookies. Want a retro touch? A maraschino cherry on top is simply classic.
Side Dishes
Milkshakes are so much more than just a beverage—they’re a companion to your favorite comfort foods! Serve this shake alongside crispy golden fries, a juicy cheeseburger, or hot-from-the-oven cookies for a full diner-style feast that’ll put a smile on everyone’s face.
Creative Ways to Present
Take your Milkshake Recipe to the next level by going all out on presentation. Try pouring shakes into mason jars, rim the glass in crushed cookies, or even let each guest build their own shake with a milkshake bar—think bowls of mix-ins, toppings, and sauces. No two will look quite the same, and that’s half the fun!
Make Ahead and Storage
Storing Leftovers
If you have extra milkshake (a rare event!), store it in the refrigerator for up to 12 hours. Give it a good stir or a quick blend before serving, as it may separate a little. While it’s best freshly blended, this trick lets you enjoy any leftovers without missing a beat.
Freezing
For longer storage, pour the leftover Milkshake Recipe into a freezer-safe container. When you’re ready for round two, thaw in the fridge for 30–60 minutes. Pop it back in the blender for a quick whiz, and you’ll have a nearly fresh shake ready to serve.
Reheating
Milkshakes are a cold treat, so skip the microwave! If the shake has hardened too much in the freezer, just let it thaw on the counter, then blend or stir as needed. Never actually heat it up, as that’ll just turn your delicious shake into, well, sweet milk soup.
FAQs
Can I make this Milkshake Recipe dairy-free?
Absolutely! Use your favorite plant-based milk (such as almond, soy, or coconut) and dairy-free ice cream—there are fantastic options in most supermarkets now. Top with vegan whipped cream for a treat everyone can love.
How can I make my milkshake thicker or thinner?
For a thicker shake, use less milk and more ice cream; for a thinner, sippable shake, simply add a bit more milk. Feel free to play around to find the texture you love most.
What are some fun mix-ins for a Milkshake Recipe?
The sky’s the limit! Try blending in strawberries, bananas, peanut butter, espresso, chocolate chips, or even cookies. Every mix-in adds new personality and flavor—so have fun experimenting.
Can I make milkshakes ahead of time for a party?
You can blend and freeze milkshakes up to a day in advance. Let them thaw slightly in the fridge and blend again right before serving for the best texture. For interactive fun, consider setting up a milkshake bar so guests can customize their own shakes to order.
My shake keeps melting too fast. Any tips?
Chilling your glasses in the freezer for 10 minutes before serving will help keep your Milkshake Recipe cold and thick longer. Also, try not to over-blend, since heat from the blender can cause the ice cream to melt too soon.
Final Thoughts
If you’re ready for a little kitchen magic, you just can’t beat this Milkshake Recipe. It’s utterly joyful, endlessly customizable, and a guaranteed hit with everyone from grandkids to grandparents. Grab your scoop, fire up your blender, and let yourself enjoy every creamy, frosty sip!
Print
Milkshake Recipe
- Total Time: 6–7 minutes
- Yield: 2 servings 1x
- Diet: Vegetarian
Description
Learn how to make a classic vanilla milkshake at home with this easy recipe. Perfect for a sweet treat or dessert, this milkshake is creamy, flavorful, and customizable with different variations.
Ingredients
For Classic Vanilla Milkshake:
- 2 cups vanilla ice cream (about 4 scoops)
- 1 cup whole milk (or any milk of choice)
- 1 teaspoon vanilla extract
Optional Garnishes:
- Whipped cream
- Sprinkles
- Chocolate syrup
Instructions
- Add Ice Cream to the Blender: Scoop 2 cups of vanilla ice cream into the blender.
- Pour in the Milk: Add 1 cup of milk of choice.
- Add Flavorings: Mix in 1 teaspoon of vanilla extract.
- Blend Until Smooth: Blend until creamy, adding more milk if needed.
- Pour and Garnish: Serve in glasses, topped with whipped cream, sprinkles, or chocolate syrup.
Notes
- Chill glasses before serving for a colder shake.
- Experiment with different flavors and toppings for variety.
- Adjust sweetness to your preference with sugar or honey.
- Prep Time: 5 minutes
- Cook Time: 0 minutes
- Category: Beverage
- Method: Blending
- Cuisine: American
Nutrition
- Serving Size: 1 milkshake
- Calories: 380–450
- Sugar: 35g
- Sodium: 160mg
- Fat: 20g
- Saturated Fat: 12g
- Unsaturated Fat: 6g
- Trans Fat: 0g
- Carbohydrates: 45g
- Fiber: 0g
- Protein: 8g
- Cholesterol: 75mg
Keywords: milkshake recipe, vanilla milkshake, dessert, easy, sweet treat


