
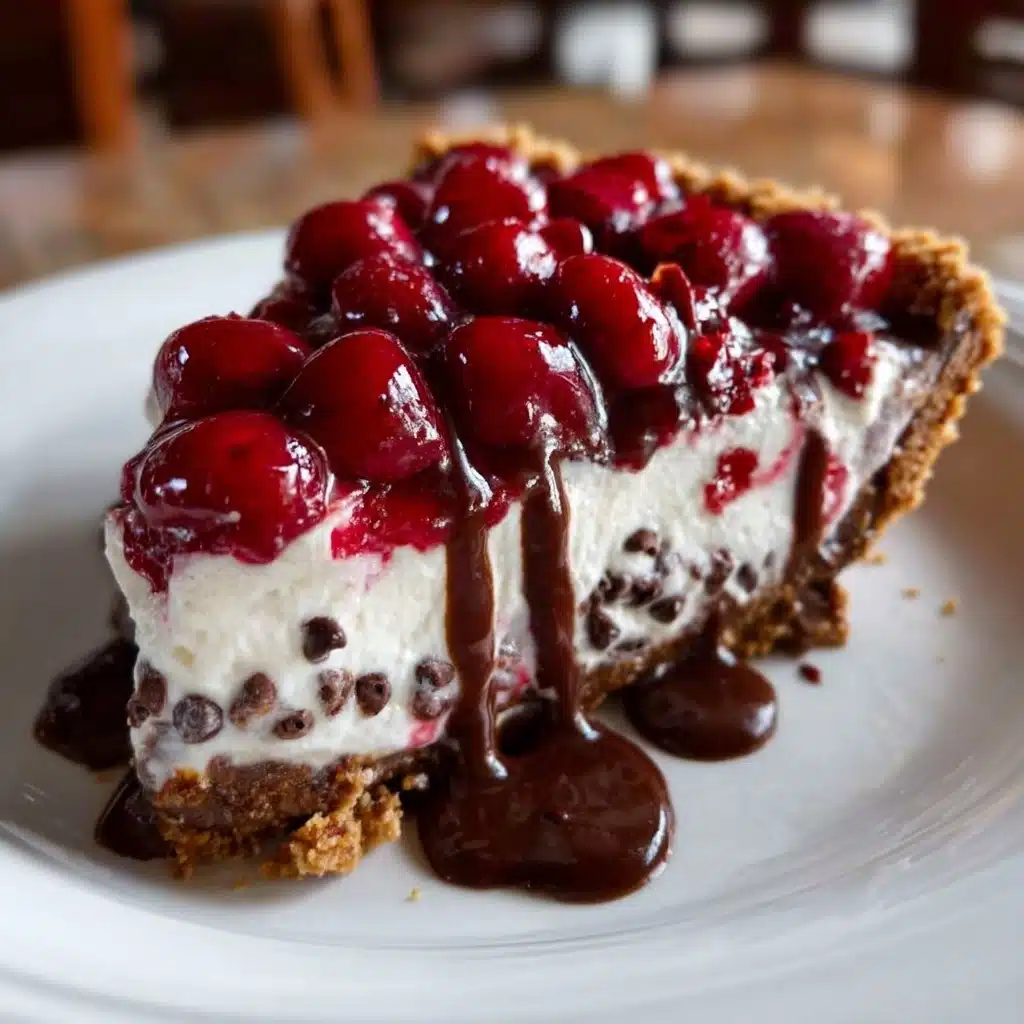
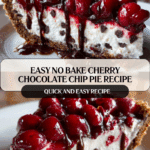
No Bake Easy Cherry Chocolate Chip Pie: 6 Simple Steps Recipe
If you’re searching for a dessert that combines irresistible flavors without heating up your kitchen, this No Bake Easy Cherry Chocolate Chip Pie: 6 Simple Steps is exactly what you need. This pie brings together the luscious sweetness of cherry pie filling with the rich, melty charm of chocolate chips enveloped in a creamy, dreamy filling, all nestled in a crisp graham cracker crust. The best part? You can create this impressive dessert without turning on the oven, making it perfect for warm days, last-minute guests, or anyone craving a quick and delightful treat that feels truly special.

Ingredients You’ll Need
Don’t let the simplicity of the ingredients fool you; each one plays a crucial role in creating that perfect balance of creamy, fruity, and chocolaty goodness. Using convenient staples like a pre-made graham cracker crust speeds up the process, while cream cheese and whipped cream combine to give the pie a smooth, light texture. The chocolate chips add delightful bursts of texture, and the cherry pie filling gives the dessert its vibrant color and signature tangy-sweet zip.
- Pre-made graham cracker crust: A crunchy base that saves time and complements the creamy filling perfectly.
- Cherry pie filling: Bursting with juicy cherries and sweet syrup, it adds vibrant color and fresh flavor.
- Chocolate chips: Small pockets of melted chocolate throughout add a rich and indulgent texture.
- Whipped cream: Brings a light, airy quality that balances the richness of cream cheese.
- Cream cheese (8 oz): Offers tangy creaminess that forms the base of the pie’s filling.
- Powdered sugar (1/2 cup): Sweeter than granulated sugar, it blends smoothly for the perfect sweetness level.
How to Make No Bake Easy Cherry Chocolate Chip Pie: 6 Simple Steps
Step 1: Beat the Cream Cheese Until Smooth
Start by softening your cream cheese so that it whips up easily. Use a hand mixer or stand mixer to beat it on medium speed until it’s silky smooth with absolutely no lumps. This step ensures the filling will be velvety and luxurious, laying the perfect foundation for the pie’s texture.
Step 2: Add Powdered Sugar and Mix
Sprinkle in the powdered sugar gradually and continue mixing until it’s fully incorporated. Powdered sugar not only sweetens but also prevents grittiness, keeping the filling silky while adding a touch of sweetness that complements the tang of cream cheese and cherries.
Step 3: Fold in Whipped Cream and Chocolate Chips
Gently fold in the whipped cream to keep the mixture airy and light—this step requires a delicate touch to maintain that fluffiness. Then fold in the chocolate chips, which will add surprising bursts of chocolaty goodness in every bite.
Step 4: Spread the Mixture into the Graham Cracker Crust
Grab your pre-made graham cracker crust and spread the creamy filling evenly inside. Press it gently so the filling nests nicely in the crust but avoid overworking it to keep the texture perfect.
Step 5: Top with Cherry Pie Filling
The star of this pie arrives here: spoon the cherry pie filling liberally over the creamy layer. The bright red cherries make the pie pop visually and add a tangy-sweet finishing touch that balances the richness below.
Step 6: Chill in the Refrigerator for at Least 2 Hours
Place your pie in the fridge and let it firm up. Chilling allows the flavors to marry and the filling to set perfectly. This step is what transforms the simple ingredients into an outstanding dessert that slices beautifully and tastes heavenly.
How to Serve No Bake Easy Cherry Chocolate Chip Pie: 6 Simple Steps
Garnishes
To elevate your pie even further, think fresh and simple. A few extra fresh cherries on top can add a juicy burst, while a light dusting of powdered sugar or shaved chocolate brings an elegant touch. A sprig of mint not only looks beautiful but also adds a refreshing aroma that’s a subtle contrast to the richness.
Side Dishes
This pie pairs wonderfully with a scoop of vanilla ice cream or a dollop of freshly whipped cream for those who want a double dose of creaminess. Alternatively, fresh fruit salad on the side complements the cherry topping nicely, providing a fresh, bright palate cleanser between indulgent bites.
Creative Ways to Present
If you’re making this pie for a special occasion, try serving it in individual dessert cups layered with extra cherries and chocolate chips. You could also slice it and arrange on a dessert platter garnished with edible flowers or drizzle some melted chocolate or cherry sauce artistically across each slice for that wow factor.
Make Ahead and Storage
Storing Leftovers
This pie keeps beautifully in the fridge for up to 3 days. Store it covered with plastic wrap or in an airtight container to prevent it from absorbing other flavors and to keep the crust crisp and filling fresh.
Freezing
If you want to save it longer, you can freeze the pie for up to a month. Wrap it tightly in plastic wrap and then in foil to protect against freezer burn. Thaw overnight in the fridge before serving to maintain the best texture and flavor.
Reheating
This is a no bake dessert best enjoyed chilled, so reheating isn’t recommended. Instead, simply let it sit at room temperature for 10–15 minutes before serving if taken straight from the refrigerator to soften the filling slightly and enhance the flavors.
FAQs
Can I use fresh cherries instead of canned cherry pie filling?
Fresh cherries can be a delicious alternative, but you’ll want to cook them down with sugar a bit to mimic the thick, syrupy texture of the pie filling. This ensures your pie has the perfect consistency and sweetness.
Is it possible to use mini chocolate chips instead of regular size?
Absolutely! Mini chocolate chips disperse more evenly throughout the filling, giving you chocolate in almost every bite without overwhelming the cherry flavor.
Can I make this pie vegan or dairy-free?
Yes, by substituting cream cheese and whipped cream with vegan alternatives like cashew-based cream cheese and coconut whipped cream, you can enjoy this pie dairy-free. Just make sure your chocolate chips and pie crust are vegan too!
What’s the best way to get clean slices when serving?
Use a sharp knife dipped in hot water and wiped dry before slicing. This prevents sticking and helps you cut neat, attractive slices each time.
Can I double the recipe for a larger gathering?
Definitely! Just make sure to use a larger crust or multiple smaller pie pans, and adjust chilling times as needed to ensure your pie sets fully.
Final Thoughts
This No Bake Easy Cherry Chocolate Chip Pie: 6 Simple Steps is a total winner when you want a delightfully simple yet impressive dessert. It’s approachable for beginners but charming enough to wow any crowd. Whip it up anytime you want a fuss-free treat bursting with flavor, texture, and that nostalgic touch of homemade goodness. Go ahead and give it a try—your dessert game just got a delicious upgrade!
Print
No Bake Easy Cherry Chocolate Chip Pie: 6 Simple Steps Recipe
- Total Time: 2 hours 15 minutes
- Yield: 8 servings 1x
- Diet: Vegetarian
Description
A simple and delicious no-bake cherry chocolate chip pie that combines a creamy chocolate chip filling with sweet cherry topping, all nestled in a crunchy graham cracker crust. Perfect for quick preparation and a delightful dessert for any occasion.
Ingredients
Crust
- 1 pre-made graham cracker crust (9-inch)
Filling
- 8 oz cream cheese, softened
- 1/2 cup powdered sugar
- 1 cup whipped cream
- 1 cup chocolate chips
Topping
- 1 can (about 21 oz) cherry pie filling
Instructions
- Beat the cream cheese: In a mixing bowl, beat the softened cream cheese with an electric mixer until it becomes smooth and creamy, ensuring no lumps remain.
- Add powdered sugar: Gradually add the powdered sugar to the cream cheese and continue mixing until fully combined and the mixture is smooth.
- Fold in whipped cream and chocolate chips: Gently fold the whipped cream into the cream cheese mixture to maintain a light texture, then carefully fold in the chocolate chips for bursts of chocolate flavor throughout the filling.
- Spread mixture into crust: Evenly spread the chocolate chip and cream cheese filling into the pre-made graham cracker crust, smoothing the top with a spatula.
- Top with cherry pie filling: Spoon the cherry pie filling over the chocolate chip layer, spreading it gently to cover the entire surface of the pie.
- Chill before serving: Refrigerate the pie for at least 2 hours to allow it to set properly and for flavors to meld, then slice and serve chilled.
Notes
- Use softened cream cheese for easier mixing and a smoother texture.
- For added texture, you can toast the chocolate chips lightly before folding them in.
- This pie is best served chilled and can be made up to one day in advance.
- Store leftovers covered in the refrigerator for up to 3 days.
- For a gluten-free option, use a gluten-free graham cracker crust.
- Prep Time: 15 minutes
- Cook Time: 0 minutes
- Category: Dessert
- Method: No Bake
- Cuisine: American
Nutrition
- Serving Size: 1 slice (1/8 of pie)
- Calories: 320
- Sugar: 26g
- Sodium: 180mg
- Fat: 20g
- Saturated Fat: 12g
- Unsaturated Fat: 6g
- Trans Fat: 0g
- Carbohydrates: 32g
- Fiber: 1g
- Protein: 4g
- Cholesterol: 45mg
Keywords: No Bake Pie, Cherry Chocolate Chip Pie, Easy Dessert, Graham Cracker Crust, Cream Cheese Pie