
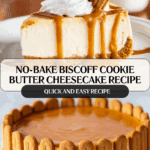
No-Bake Biscoff Cookie Butter Cheesecake Recipe
If you have a sweet tooth and a love for all things creamy and indulgent, then let me introduce you to the magic of the No-Bake Biscoff Cookie Butter Cheesecake. This dessert is a luscious combination of velvety cream cheese blended with rich Biscoff cookie butter, resting on a perfectly crumbly cookie crust and topped with drizzles of golden cookie butter. The best part? It doesn’t require an oven, making it an effortless showstopper for any occasion. Every bite delivers that cozy caramelized spice flavor of Biscoff cookies with a dreamy cheesecake texture that will have you coming back for more.
Ingredients You’ll Need
Getting the ingredients right is key to nailing this cheesecake’s perfect balance of flavor and texture. Each component is simple but plays an essential role in bringing out the rich, creamy, and spiced character that makes this dessert so unforgettable.
- Biscoff cookie crumbs: The base for your crust, providing that signature sweet and cinnamon-like flavor with a satisfying crunch.
- Melted butter: Used to bind the crumbs together and give the crust a rich, buttery depth.
- Cream cheese (softened): Creates the smooth, silky cheesecake filling that melts in your mouth.
- Sugar: Sweetens the filling just enough to balance the spices and creaminess perfectly.
- Biscoff spread (cookie butter): The star ingredient, infusing the filling with that unmistakable caramelized cookie flavor.
- Heavy cream: Whipped into the filling to add lightness and a luscious texture that holds its shape.
- Extra cookie butter for topping: Adds a glossy, decadent finish to the cheesecake’s surface.
- More cookies for border and garnish: Adds a beautiful, graphic touch and extra texture for presentation and enjoyment.
How to Make No-Bake Biscoff Cookie Butter Cheesecake
Step 1: Prepare the Crust
Start by pulsing the Biscoff cookies in a food processor until they become fine crumbs. This crumbly mixture is the foundation of your cheesecake’s flavor and texture. Melt your butter and stir it into the crumbs until everything resembles damp sand, ready to hold together. This step is crucial because it will ensure your crust is sturdy yet tender.
Step 2: Press the Crust Into the Pan
Pour the crumb mixture into an 8-inch springform pan. Use the back of a metal spoon to firmly press it into the bottom and partly up the sides of the pan. This compact base will hold your creamy filling beautifully and makes slicing easier with a clean edge. Plus, no hands get messy in this method!
Step 3: Create the Cookie Border
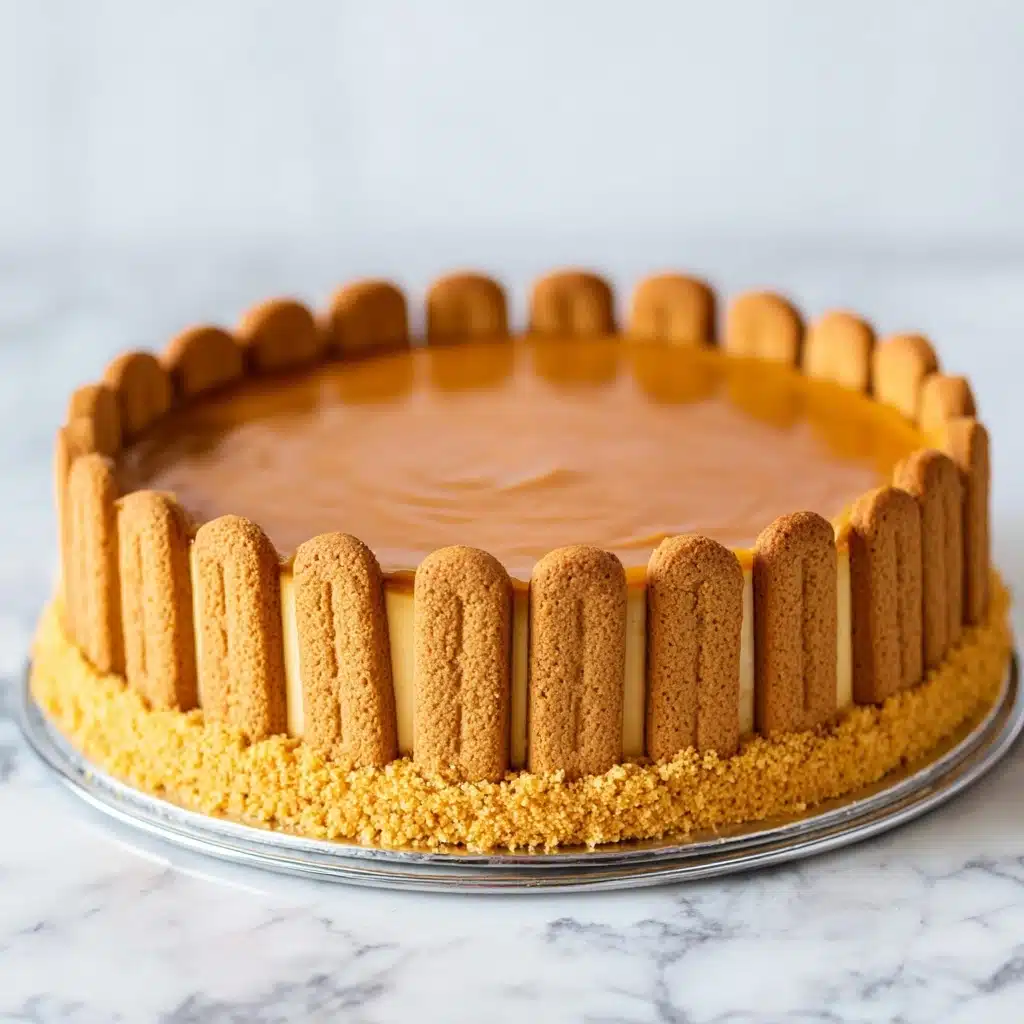
Now for a little pizzazz without baking: stand extra Biscoff cookies upright along the inside edge of the pan. This decorative border adds visual interest and an extra bite of crunch, creating that professional look you’ll be proud of. It’s such a fun touch that elevates this cheesecake instantly.
Step 4: Make the Cheesecake Filling
In your mixing bowl, blend the softened cream cheese, sugar, and the first portion of the Biscoff spread with an electric mixer until silky and lump-free. This mixture forms the luscious base of the cheesecake. It’s important to get it nice and smooth to avoid any graininess in the final dessert.
Step 5: Whip in the Heavy Cream
Next, pour in the heavy cream and continue whipping until the filling transforms into a thick, fluffy cloud of cheesecake goodness. The cream adds lightness and helps the filling to set without baking, creating that perfect, spoonable texture this recipe is famous for.
Step 6: Assemble the Cheesecake
Gently spoon the fluffy filling over your prepared crust, smoothing it evenly with a spatula. Take your time here to make it look neat and inviting, because presentation always counts, even when the flavor will steal the show.
Step 7: Add the Cookie Butter Topping
Heat the remaining cookie butter in short bursts in the microwave until it’s pourable but still thick. Drizzle it all over the cheesecake filling and use a spatula to spread it into an even, glossy layer. This final touch is what makes the No-Bake Biscoff Cookie Butter Cheesecake truly irresistible.
Step 8: Chill to Set
Place the cheesecake in the refrigerator for at least 6 hours to let it firm up perfectly. If you’re pressed for time, the freezer can speed things up and set it in about 4 hours. This chilling step allows the flavors to meld beautifully and the texture to firm just right.
Step 9: Slice and Serve
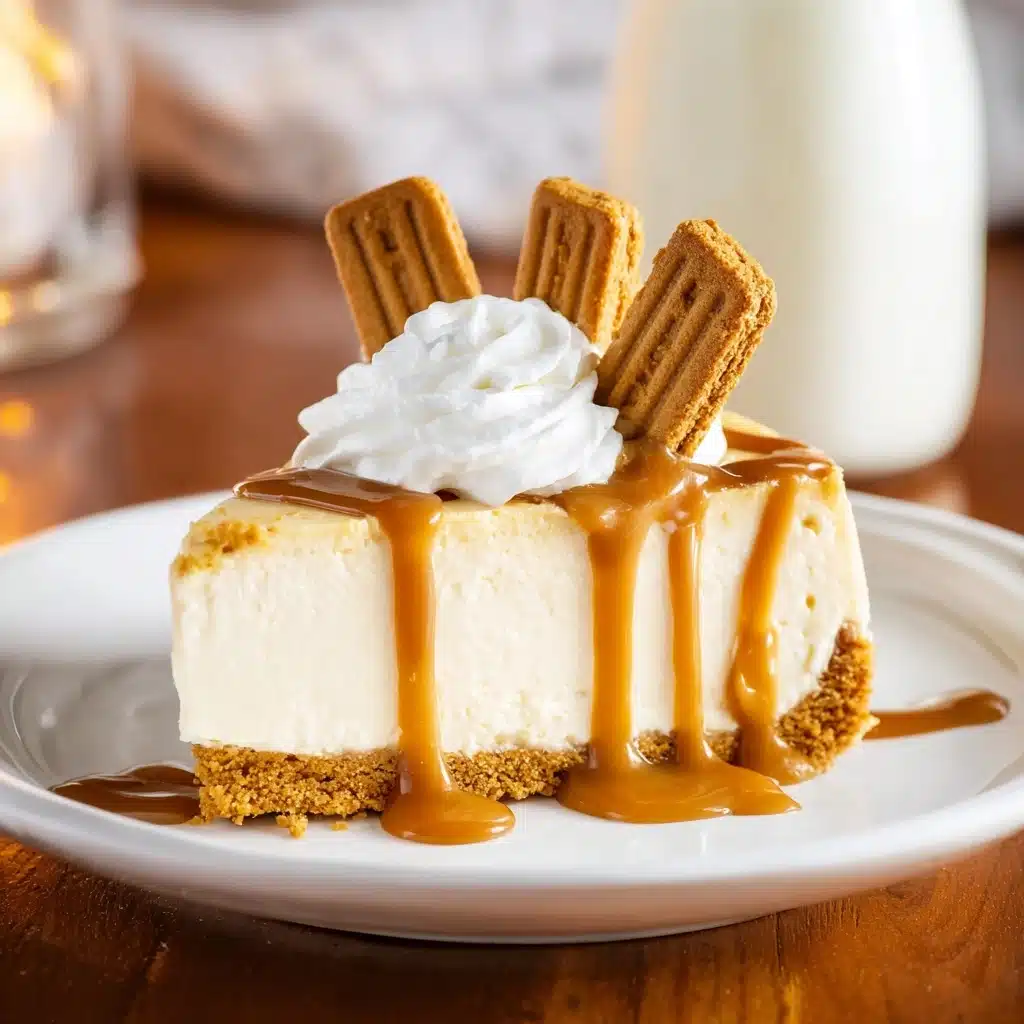
Once set, remove the cheesecake from the springform pan and slice it into generous pieces. Add some flair by topping each slice with a dollop of whipped cream, a cookie piece, and an extra drizzle of melted cookie butter — every bite is an experience of creamy, crunchy, and caramelized bliss.
How to Serve No-Bake Biscoff Cookie Butter Cheesecake
Garnishes
Elevate your cheesecake presentation with simple yet stunning garnishes. Whipped cream swirls add creaminess, while extra Biscoff cookie pieces offer that satisfying crunch. A light drizzle of warm cookie butter over each slice not only looks elegant but doubles down on that addictive Biscoff flavor.
Side Dishes
Pair your cheesecake with fresh berries like raspberries or sliced strawberries for a refreshing contrast. A cup of coffee or chai tea complements the spiced notes of the cookie butter perfectly, making a lovely afternoon treat or after-dinner indulgence.
Creative Ways to Present
Thinking outside the box? Serve the cheesecake in individual jars or ramekins layered with extra cookie crumbs and dollops of whipped cream for an elegant twist. You can also create mini cheesecakes using cupcake liners and a muffin tin for bite-sized delights that are perfect for parties.
Make Ahead and Storage
Storing Leftovers
Keep any leftover No-Bake Biscoff Cookie Butter Cheesecake covered tightly in the refrigerator for up to 4 days. This cheesecake maintains its creamy texture and rich flavor well, making it a perfect make-ahead dessert.
Freezing
This cheesecake freezes beautifully. Wrap it tightly in plastic wrap and foil, then store it in an airtight container for up to 2 months. Thaw overnight in the fridge before serving to preserve its smooth texture and delicious flavor.
Reheating
Since this is a no-bake, chilled dessert, it’s best enjoyed cold. Avoid reheating. Instead, let frozen slices thaw slowly in the refrigerator to retain their creamy consistency and flavor integrity.
FAQs
Can I use regular peanut butter instead of Biscoff cookie butter?
While peanut butter will add a different nutty flavor, it won’t provide that distinctive caramelized spice of Biscoff cookie butter that makes this cheesecake so special. For the authentic flavor, stick to Biscoff spread.
Do I really need a springform pan for this recipe?
A springform pan is highly recommended because it allows for easy removal of the cheesecake without ruining its delicate edges. If you don’t have one, a regular cake pan lined with parchment paper can work, but handle carefully.
How long does the cheesecake need to chill before serving?
A minimum of 6 hours in the fridge is ideal for firm setting and flavor melding. If you’re short on time, freezing the cheesecake for 4 hours speeds up the process effectively.
Can I make this cheesecake vegan or dairy-free?
Substituting for dairy and non-vegan ingredients can be tricky here because the creamy texture is crucial. However, using vegan cream cheese, coconut cream, and vegan cookie butter spreads might work, but expect slight changes in texture and flavor.
What’s the best way to cut this cheesecake cleanly?
For the cleanest slices, chill the cheesecake thoroughly and use a sharp knife. Wiping the knife blade clean with a warm, damp cloth between cuts helps keep edges neat and prevents smudging.
Final Thoughts
If you’re looking for a dessert that’s cozy, sophisticated, and insanely delicious yet easy to make, the No-Bake Biscoff Cookie Butter Cheesecake is your new best friend. It brings a delightful blend of creamy richness and spiced cookie charm to your table without heating up the kitchen. Trust me, once you’ve tried this, it will become the star of your dessert repertoire.
Print
No-Bake Biscoff Cookie Butter Cheesecake Recipe
- Total Time: 6 hours 20 minutes
- Yield: 12 servings 1x
- Diet: Vegetarian
Description
This No-Bake Biscoff Cookie Butter Cheesecake is a rich and creamy dessert featuring a crunchy Biscoff cookie crust, a velvety cookie butter-infused cream cheese filling, and a luscious cookie butter topping. Perfect for those who love indulgent treats without turning on the oven, this cheesecake is elegantly finished with a decorative cookie border and simple garnishes for a delightful presentation.
Ingredients
Crust
- 1½ cups Biscoff cookie crumbs
- 1/3 cup butter, melted
- More Biscoff cookies for the sides
Filling
- 4 (8-ounce) blocks cream cheese, softened to room temperature
- 4 tablespoons sugar
- 1½ cups Biscoff spread (cookie butter)
- 2 cups heavy cream
Topping
- ½ cup cookie butter
- More Biscoff cookies for garnish
Instructions
- Make the crust: Add the Biscoff cookies to a food processor and pulse until they become fine crumbs. Melt the butter and stir it into the crumbs until the mixture is evenly coated and resembles damp sand.
- Press into the pan: Pour the crumb mixture into an 8-inch springform pan. Use the back of a metal measuring spoon to press the crumbs firmly into the bottom and slightly up the sides, creating an even base without using your hands.
- Create the cookie border: Stand a few extra cookies upright around the inside edge of the pan to form a decorative border that adds visual appeal without baking.
- Set aside and make the filling: In a mixing bowl, use an electric hand mixer to whip together the cream cheese, sugar, and cookie butter until smooth and creamy.
- Whip it up: Pour in the heavy cream and continue mixing until the filling is light, fluffy, and fully combined. The mixture should be thick enough to hold its shape but still super creamy.
- Assemble the cheesecake: Spoon the filling over the crust and spread it out evenly with a spatula.
- Add the topping: Melt ½ cup of cookie butter in the microwave for 30–45 seconds or until pourable. Drizzle it over the cheesecake top and gently spread it into an even layer.
- Chill to set: Place the cheesecake in the refrigerator for at least 6 hours, or in the freezer for 4 hours if you need to speed up the setting process.
- Slice and serve: Once set, remove the cheesecake from the pan and slice into pieces. Optionally, garnish each slice with whipped cream, a cookie piece, and an extra drizzle of melted cookie butter for added indulgence.
Notes
- Use full-fat cream cheese and heavy cream for best texture and flavor.
- Ensure the cream cheese is softened to room temperature before mixing to avoid lumps.
- If you don’t have a food processor, place cookies in a sealed bag and crush with a rolling pin.
- Chill the cheesecake thoroughly to allow it to fully set and develop flavor.
- The cookie border is optional but adds a beautiful presentation touch.
- Store leftovers covered in the refrigerator for up to 3 days.
- For a firmer cheesecake, freeze it and let thaw slightly before serving.
- Prep Time: 20 minutes
- Cook Time: 0 minutes
- Category: Dessert
- Method: No-bake
- Cuisine: American
Nutrition
- Serving Size: 1 slice (approx. 1/12 of cheesecake)
- Calories: 480
- Sugar: 24g
- Sodium: 180mg
- Fat: 38g
- Saturated Fat: 22g
- Unsaturated Fat: 14g
- Trans Fat: 0.5g
- Carbohydrates: 30g
- Fiber: 1g
- Protein: 6g
- Cholesterol: 120mg
Keywords: Biscoff cheesecake, no-bake cheesecake, cookie butter dessert, easy cheesecake recipe, no-bake dessert

