
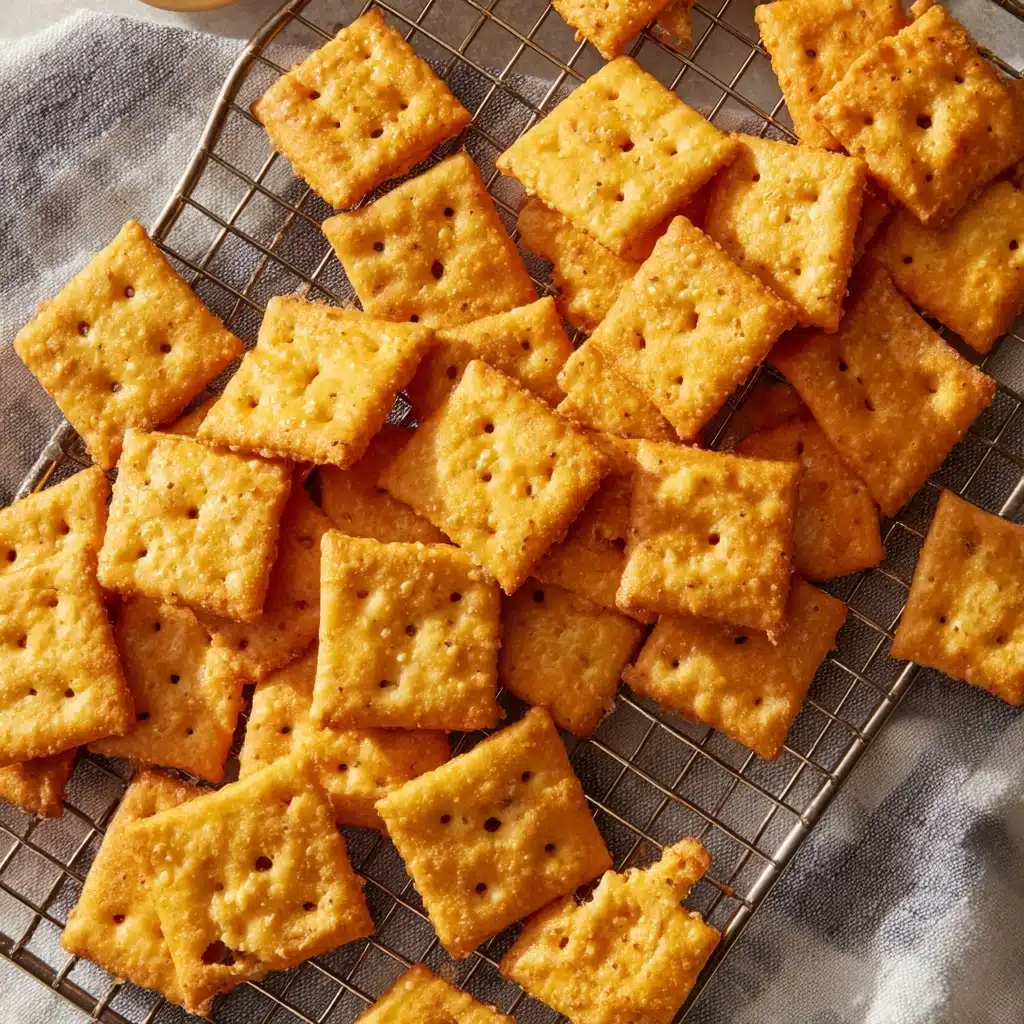
Homemade Cheez-Its Recipe
If you’ve ever found yourself craving a perfectly crispy, cheesy snack, then let me introduce you to the magic of Homemade Cheez-Its. Imagine the best qualities you love about the store-bought version, but with so much more flavor and freshness—plus, you’re totally in control of the ingredients. This recipe delivers the ultimate cheddar-filled crunch, with every bite bringing you that iconic, addictive, slightly salty tang you can only get from real cheddar cheese. Making Homemade Cheez-Its has become a little tradition in my kitchen and always earns rave reviews, whether at family movie night or as a surprise nibble for friends.

Ingredients You’ll Need
Good news: you don’t need a long shopping list or fancy specialty items to whip up a batch of these Homemade Cheez-Its. Every ingredient in this recipe is simple but essential, adding important flavor, texture, and that classic golden hue we all crave.
- Extra sharp cheddar cheese (8-ounce block, coarsely shredded): This is the heart and soul of Homemade Cheez-Its, delivering bold, tangy flavor and that signature orange color.
- Unsalted butter (4 tablespoons, cubed, room temperature): Butter adds rich flavor and helps create that flaky, tender bite.
- Kosher salt (1 teaspoon): Don’t skip the salt—it enhances the cheese and brings all the flavors together.
- Unbleached all-purpose flour (1 cup): Flour provides structure and gives the crackers their trademark snap.
- Ice water (2 tablespoons): A splash of ice water helps bind the dough without warming it up, ensuring the crackers stay light and crisp.
How to Make Homemade Cheez-Its
Step 1: Cream the Cheese, Butter, and Salt
Start by adding your shredded cheddar, room temperature butter, and salt into the bowl of a stand mixer fitted with the paddle attachment. Beat everything together until the mixture is soft and homogenous—almost like a thick cheese spread. This step ensures the cheese is evenly distributed, giving every cracker that Cheez-It power punch of flavor.
Step 2: Add the Flour
Pour in the flour and mix on low speed. You’ll notice the dough looks dry and pebbly at first—don’t panic, that’s exactly how you want it. This stage is all about gently bringing the ingredients together without overworking the dough, setting the scene for a crispy, delicate cracker.
Step 3: Incorporate Ice Water
Slowly drizzle in the ice water as the mixer runs on low. Let the dough come together into a ball. If it still seems a little crumbly, resist the urge to add more water; just keep mixing and watch as the dough magically coalesces. Using chilled water helps keep the butter cold, which is your secret weapon for flakiness.
Step 4: Chill the Dough
Shape the dough into a flat disk and wrap it up tightly in plastic wrap. Pop it in the refrigerator for at least an hour. This rest allows the gluten to relax, making it much easier to roll out the dough super-thin later (plus, it’s a sneaky way to boost flavor and texture!).
Step 5: Preheat and Prepare
Preheat your oven to 375 degrees F and line two baking sheets with parchment paper or silicone baking mats. This saves your crackers from sticking and makes cleanup a breeze. Getting the oven hot and ready ensures each Homemade Cheez-Its batch bakes up golden and crisp, every single time.
Step 6: Roll and Cut
Take the dough out of the fridge and divide it in half for easier handling. Roll each piece into a rectangle about 10 by 12 inches, aiming for a thickness of 1/8 inch or even less. The thinner you roll, the crunchier the cracker! Grab a fluted pastry cutter and slice the dough into adorable 1-inch squares—their cheerful, imperfect shapes just add to their homemade charm.
Step 7: Add the Signature Center Hole
Use the tip of a chopstick to poke a hole in the center of each square. This isn’t just for looks—the hole helps these crackers bake evenly and gives them that authentic Homemade Cheez-Its vibe you know and love.
Step 8: Bake to Perfection
Bake the crackers for about 15 minutes. Keep a close watch, especially in the last few minutes—these go from golden to overdone very quickly with their high cheese and butter content! Pull them when the edges are just turning brown and the centers are puffed. Transfer immediately to a wire rack—the residual heat will keep them crisp as they cool.
How to Serve Homemade Cheez-Its
Garnishes
For a playful twist, you can sprinkle a pinch of flaky sea salt or a dusting of smoked paprika over your Homemade Cheez-Its right after baking. This little extra makes every bite feel a bit more gourmet. I sometimes grate a touch of Parmesan over the hot crackers for an extra cheesy punch!
Side Dishes
These crackers are fantastic on their own but even better with a few fun pairings. Serve alongside a bowl of tomato soup for a nostalgic lunch, or pile them on a charcuterie board next to salami and sliced apples. Homemade Cheez-Its also pair beautifully with creamy dips or even a cold glass of your favorite bubbly beverage.
Creative Ways to Present
Show off your Homemade Cheez-Its by tucking them into pretty jars as gifts or serving them in colorful bowls at game night. They’re perfect for packing into lunchboxes, wrapping up in parchment for on-the-go snacking, or using as croutons on a bold salad for some serious crunch factor.
Make Ahead and Storage
Storing Leftovers
Leftovers? You may actually have some with this recipe, though I wouldn’t count on it! Store your Homemade Cheez-Its in an airtight container at room temperature for up to a week. They’ll keep their freshness and crunch surprisingly well, and you can always perk them up in the oven if needed.
Freezing
Want to have a stash on hand? Freeze any extra dough (tightly wrapped) for up to two months. When a snack craving hits, just thaw and roll out as usual. I don’t recommend freezing baked crackers, as it can affect their texture.
Reheating
If your Homemade Cheez-Its lose a bit of their crispness, simply reheat them in a 300 degree F oven for 3 to 5 minutes. Let them cool before diving back in—they’ll return to their original crunchy glory, good as new!
FAQs
Can I use pre-shredded cheese for Homemade Cheez-Its?
While it’s tempting, I recommend using a block of cheese and shredding it yourself. Pre-shredded cheese often has anti-caking agents that can keep your crackers from baking up as crisp and flavorful as possible.
Do I need a stand mixer to make Homemade Cheez-Its?
You don’t! You can make the dough by hand with a pastry cutter or even two forks. The stand mixer just makes the process speedier and helps with even mixing, but it’s not a deal-breaker if you don’t have one.
What’s the secret to ultra-crispy Homemade Cheez-Its?
Rolling out the dough thinly and evenly is key, as is making sure to bake the crackers until the edges are deeply golden. Cool them completely on a rack so the air can circulate and finish crisping them up.
Can I add spices to customize the flavor?
Absolutely! Try mixing in a pinch of cayenne, garlic powder, or even some herbes de Provence with the dough for your own signature Homemade Cheez-Its twist.
Why do I need to refrigerate the dough?
Chilling the dough helps the butter firm up and relaxes the gluten, making the crackers easier to roll and ensuring a short, flaky texture. Don’t skip this step for best results!
Final Thoughts
There’s truly something special about pulling a tray of Homemade Cheez-Its out of the oven—the smell, the color, the shattering crunch. If you’re ready to experience the joy of snacking at its finest, give this recipe a try and make it your own. Happy baking, and don’t forget to share a batch (or hide a stash for yourself)!
Print
Homemade Cheez-Its Recipe
- Total Time: 1 hour 35 minutes
- Yield: Approximately 100 crackers 1x
- Diet: Vegetarian
Description
A simple and delicious recipe for homemade Cheez-Its that are crispy and full of cheesy flavor. These crackers are perfect for snacking or serving at parties.
Ingredients
Ingredients:
- 1 8-ounce block extra sharp cheddar cheese, coarsely shredded
- 4 tablespoons (2 ounces) cubed unsalted butter, at room temperature
- 1 teaspoon kosher salt
- 1 cup (120 grams; 4 1/4 ounces) unbleached all-purpose flour
- 2 tablespoons ice water
Instructions
- Mix Cheese, Butter, and Salt: In the bowl of a stand mixer, combine the cheddar, butter, and salt until soft and well mixed.
- Add Flour: Mix in the flour on low speed until the dough becomes dry and crumbly.
- Incorporate Water: Slowly add ice water while mixing until the dough forms a cohesive mass.
- Chill the Dough: Shape the dough into a disk, wrap in plastic, and refrigerate for at least 1 hour.
- Preheat and Prepare: Preheat the oven to 375°F and line baking sheets with parchment paper.
- Roll Out Dough: Divide the dough, roll each piece thinly into rectangles, and cut into squares.
- Cut and Shape: Use a pastry cutter to create 1-inch squares and punch a hole in the center of each.
- Bake: Bake for about 15 minutes until golden brown, then cool on racks.
Notes
- You can experiment with different cheese varieties for unique flavors.
- Adjust the salt to suit your taste preferences.
- Prep Time: 20 minutes
- Cook Time: 15 minutes
- Category: Snack
- Method: Baking
- Cuisine: American
Nutrition
- Serving Size: 1 serving (about 10 crackers)
- Calories: 120
- Sugar: 0.5g
- Sodium: 180mg
- Fat: 8g
- Saturated Fat: 5g
- Unsaturated Fat: 2.5g
- Trans Fat: 0g
- Carbohydrates: 8g
- Fiber: 0.5g
- Protein: 4g
- Cholesterol: 20mg
Keywords: Cheez-Its, crackers, homemade snacks, cheese crackers

