
Guide to Making Authentic Katsu at Home Recipe
If you have ever craved that perfect crispy, juicy katsu dish but thought it was complicated to make at home, this Guide to Making Authentic Katsu at Home is here to change the game. Imagine tender chicken or pork coated in a golden panko crust, served atop fluffy, vinegar-seasoned rice, all brought together by a rich, tangy sauce. This recipe not only walks you through every step with love and clarity but also reveals the secrets to achieving the exact flavors and textures that make katsu a beloved comfort food in Japanese cuisine. Whether you’re a seasoned cook or a kitchen newbie, this guide ensures you can confidently recreate that restaurant-quality dish right in your own kitchen.
Ingredients You’ll Need
These ingredients are absolutely essential, and each one plays a starring role in delivering the crispy, savory, and vibrant experience you expect from authentic katsu. From the panko breadcrumbs crisping up perfectly to the subtle tang in the rice and the umami-packed sauce, every component harmonizes beautifully.
- 2 boneless chicken breasts (or pork loin, if preferred): The star protein; pounding them ensures even cooking and tenderness.
- Salt and pepper, to taste: Simple seasoning that enhances the natural flavors of your meat.
- 1 cup all-purpose flour: Provides the base for a breading that sticks well and crisps beautifully.
- 2 large eggs: Helps the panko breadcrumbs adhere for that irresistible crunch.
- 1 cup panko breadcrumbs: The secret to the ultra-crispy texture that’s signature to katsu.
- Vegetable oil, for frying: Neutral oil with a high smoke point to achieve a perfect golden crust.
- 2 cups Japanese short-grain rice: Sticky and sweet, ideal for forming the perfect bowl base.
- 2 ½ cups water: For cooking the rice evenly and properly.
- 1 tablespoon rice vinegar: Adds a subtle tang and helps season the rice just right.
- 1 tablespoon sugar: Balances the vinegar in the rice seasoning with a gentle sweetness.
- ½ teaspoon salt: Enhances all the flavors without overpowering them.
- ¼ cup tonkatsu sauce (or store-bought): The rich, tangy sauce that ties everything together.
- 1 tablespoon soy sauce: Adds depth and umami to the sauce blend.
- 1 teaspoon Worcestershire sauce: Gives the sauce complex savory notes.
- 1 teaspoon ketchup: Adds a subtle sweetness and bright color to the sauce.
- 1 cup shredded cabbage: Provides crisp freshness and texture contrast.
- 2 green onions, sliced: Adds a mild onion flavor and color pop.
- Sesame seeds, for garnish: Nutty and visually appealing finishing touch.
- Pickled ginger (optional): Offers a refreshing and palate-cleansing bite.
How to Make Guide to Making Authentic Katsu at Home
Step 1: Perfect Your Rice
Start by rinsing the Japanese short-grain rice under cold water until it runs clear; this removes excess starch for cleaner, less sticky grains. Then soak the rice in water for 30 minutes to ensure it cooks evenly. After soaking, bring it to a boil covered, then reduce the heat and simmer gently for 15 minutes without opening the lid. Finally, turn off the heat and let it rest covered for 10 minutes to finish steaming.
Step 2: Season and Flavor the Rice
While the rice rests, combine rice vinegar, sugar, and salt in a small bowl until dissolved. Gently fold this mixture into the steamed rice with care to avoid mashing the grains. This seasoning not only brightens the rice but also adds that subtle sushi-like flavor that pairs perfectly with crispy katsu.
Step 3: Prepare Your Meat
Pound your chicken breasts (or pork loin) to an even thickness of about half an inch — this ensures quick and uniform cooking and tender results. Season both sides generously with salt and pepper for a balanced foundation of flavor.
Step 4: Set Up Your Breading Station
Create three shallow dishes: place the all-purpose flour in one, beaten eggs in the second, and panko breadcrumbs in the third. This classic breading setup is key to achieving the signature crunchy coating. Pat the meat dry before dredging it in flour, then dip it into the eggs, and finally coat thoroughly with panko crumbs, pressing gently to ensure adhesion.
Step 5: Fry to Golden Perfection
Heat vegetable oil in a skillet over medium heat until shimmering but not smoking. Carefully place the breaded meat into the oil, frying for 4 to 5 minutes per side, or until the crust turns a gorgeous golden brown and the chicken or pork is cooked through. Drain on paper towels to remove excess oil and let rest before slicing to maintain juiciness.
Step 6: Whip Up the Signature Sauce
In a small bowl, mix tonkatsu sauce, soy sauce, Worcestershire sauce, and ketchup until well combined. This homemade blend packs a punch of savory, sweet, and tangy flavors that elevate your katsu to the next level and gives you the satisfaction of crafting every element from scratch.
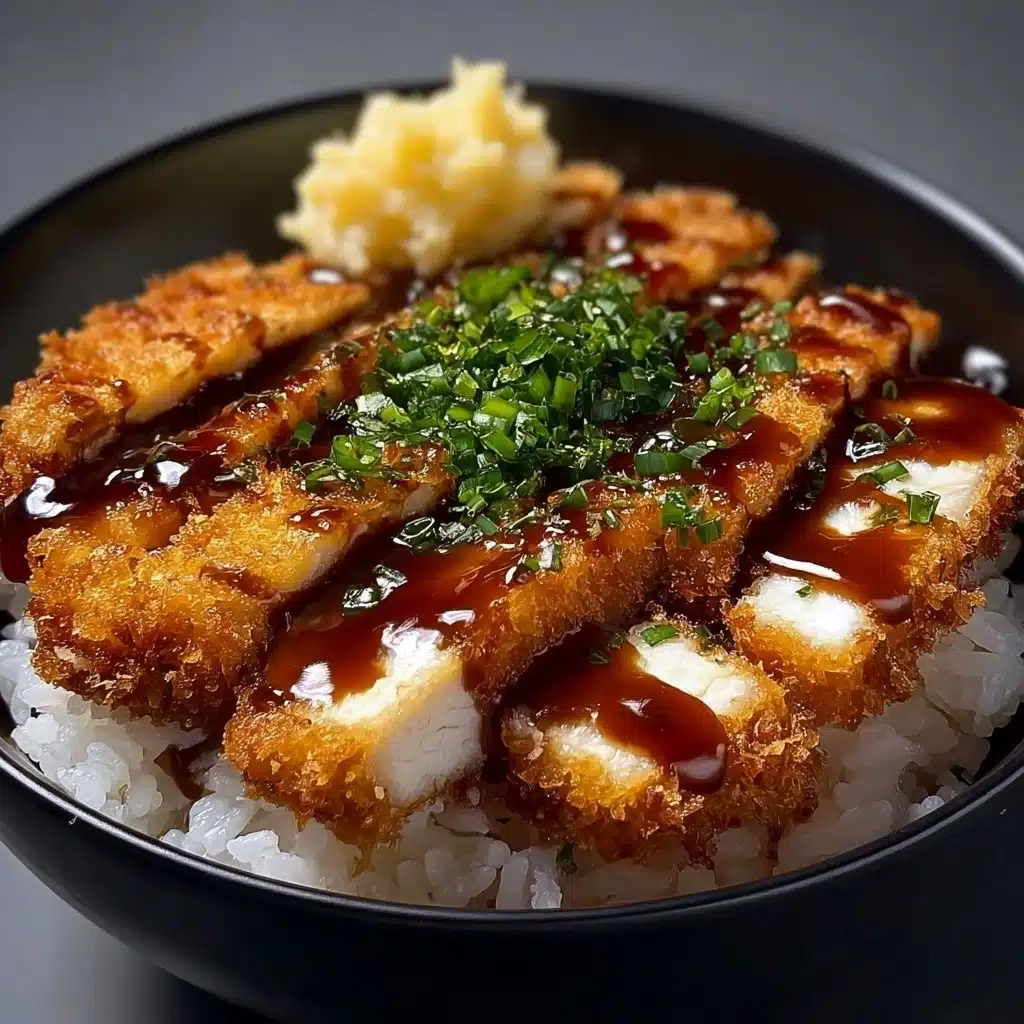
Step 7: Assemble Your Katsu Bowl
Pile the seasoned rice onto your serving plates, then layer with thinly sliced katsu. Top with shredded cabbage, green onions, and a sprinkle of toasted sesame seeds. Drizzle generously with your freshly made sauce, and if you like, add a few slices of pickled ginger for that classic touch. This presentation invites you to dig in and savor every mouthful.
How to Serve Guide to Making Authentic Katsu at Home
Garnishes
Fresh garnishes turn your katsu bowl into a feast for the eyes and palate. Shredded cabbage adds crispness and a mild sweetness which complement the rich fried cutlet. Green onions bring a subtle sharpness and color contrast, while sesame seeds provide a toasty, nutty aroma that enhances each bite. Pickled ginger is optional but highly recommended for a refreshing zing that cuts through the richness.
Side Dishes
A bowl of comforting katsu deserves sides that balance and refresh. Consider simple miso soup to warm your soul, a small seaweed salad for umami and texture, or pickled vegetables offering tang and a crunch. These sides round out your meal without overwhelming the delicate flavors of the katsu bowl.
Creative Ways to Present
Elevate your presentation by serving katsu over a bed of steamed baby greens or alongside a soft boiled egg for added creaminess. For gatherings, serve all components separately and let guests build their own bowls. You can also spice things up by offering different dipping sauces or tossing the cabbage with a light sesame dressing. Presentation is a chance to put your personality into the dish and make it even more inviting.
Make Ahead and Storage
Storing Leftovers
Leftover katsu and rice can be stored separately in airtight containers in the refrigerator for up to 2 days. Keeping the crispy cutlets and rice apart ensures the breading stays as crisp as possible before reheating.
Freezing
If you want to save katsu for a longer period, freeze the breaded and fried cutlets individually on a baking sheet until firm, then transfer to a freezer-safe container. They can be frozen for up to one month. Note that rice doesn’t freeze well due to its texture, so prepare fresh rice when ready to serve.
Reheating
To reheat and bring back that delicious crunch, warm frozen katsu cutlets in an oven or air fryer at 350°F (175°C) for about 10 minutes or until heated through. Avoid microwaving as it makes the breading soggy. Reheat rice gently covered in the microwave or on the stovetop with a splash of water.
FAQs
Can I use pork instead of chicken for katsu?
Absolutely! Pork loin or tenderloin is a classic choice for katsu and offers a slightly richer flavor. Just make sure to pound it to an even thickness and cook thoroughly.
What makes panko breadcrumbs different from regular breadcrumbs?
Panko breadcrumbs are lighter and flakier, which creates a crunchier and airier crust compared to regular breadcrumbs that are denser. This is key for the authentic texture of katsu.
Is it necessary to season the rice with vinegar and sugar?
While you can serve plain rice, seasoning with rice vinegar and sugar gives it that signature subtle tang and sweetness that complements the fried cutlet perfectly, making the dish more authentic and flavorful.
Can I bake katsu instead of frying it?
Yes, baking is an option for a lighter version. Coat the meat with panko and baking oil spray, then bake at 425°F (220°C) for about 15-20 minutes, flipping halfway, until golden and cooked through. The texture will be slightly different but still delicious.
How do I know when the oil is hot enough for frying?
Heat the oil until it shimmers but doesn’t smoke. You can also test by dropping a small piece of breading into the oil; if it sizzles and floats to the top quickly, the oil is ready for frying.
Final Thoughts
This Guide to Making Authentic Katsu at Home is more than a recipe; it’s an invitation to enjoy one of Japan’s most beloved comfort foods right in your own kitchen. The balance of crispy crust, tender meat, flavorful rice, and rich sauce is simply irresistible. I hope you feel inspired to roll up your sleeves, have fun with the process, and create a katsu bowl recipe that will become a firm favorite for you and your loved ones. Happy cooking!
Print
Guide to Making Authentic Katsu at Home Recipe
- Total Time: 50 minutes
- Yield: 2 servings 1x
- Diet: Halal
Description
Learn how to make authentic Japanese Katsu Bowls at home with crispy fried chicken or pork katsu served over perfectly seasoned short-grain rice, topped with shredded cabbage, green onions, and a tangy homemade tonkatsu sauce. This flavorful and satisfying dish combines crunchy textures with savory sauce for a comforting Japanese classic.
Ingredients
For the Katsu:
- 2 boneless chicken breasts (or pork loin, if preferred)
- Salt and pepper, to taste
- 1 cup all-purpose flour
- 2 large eggs
- 1 cup panko breadcrumbs
- Vegetable oil, for frying
For the Rice:
- 2 cups Japanese short-grain rice
- 2 ½ cups water
- 1 tablespoon rice vinegar
- 1 tablespoon sugar
- ½ teaspoon salt
For the Sauce:
- ¼ cup tonkatsu sauce (or store-bought)
- 1 tablespoon soy sauce
- 1 teaspoon Worcestershire sauce
- 1 teaspoon ketchup
For Garnish and Serving:
- 1 cup shredded cabbage
- 2 green onions, sliced
- Sesame seeds, for garnish
- Pickled ginger (optional)
Instructions
- Prepare and Cook Rice: Rinse the rice thoroughly under cold water until the water runs clear to remove excess starch. Transfer the rinsed rice to a saucepan, add 2 ½ cups water, and soak for 30 minutes. Cover and bring to a boil, then reduce heat to low and simmer for 15 minutes without lifting the lid. Turn off the heat and let the rice sit, covered, for another 10 minutes to finish steaming.
- Season the Rice: In a small bowl, mix together rice vinegar, sugar, and salt until the sugar dissolves. Gently fold this seasoning into the cooked rice, taking care not to mash the grains, to create a flavorful base for the bowl.
- Prepare the Chicken Katsu: Pound the chicken breasts to an even thickness of about ½ inch using a meat mallet or rolling pin. Season both sides with salt and pepper.
- Bread the Chicken: Set up a breading station with three shallow dishes: one with flour, one with beaten eggs, and one with panko breadcrumbs. Dredge each piece of chicken first in flour, shaking off excess, then dip in beaten eggs, and finally coat evenly with panko breadcrumbs.
- Fry the Katsu: Heat vegetable oil in a skillet over medium-high heat, enough to shallow fry. Fry the breaded chicken for 4-5 minutes on each side until golden brown and cooked through, reaching an internal temperature of 165°F (74°C). Transfer to paper towels to drain excess oil and let rest briefly.
- Make the Tonkatsu Sauce: In a small bowl, combine tonkatsu sauce, soy sauce, Worcestershire sauce, and ketchup. Mix well to create a tangy and savory sauce perfect for drizzling.
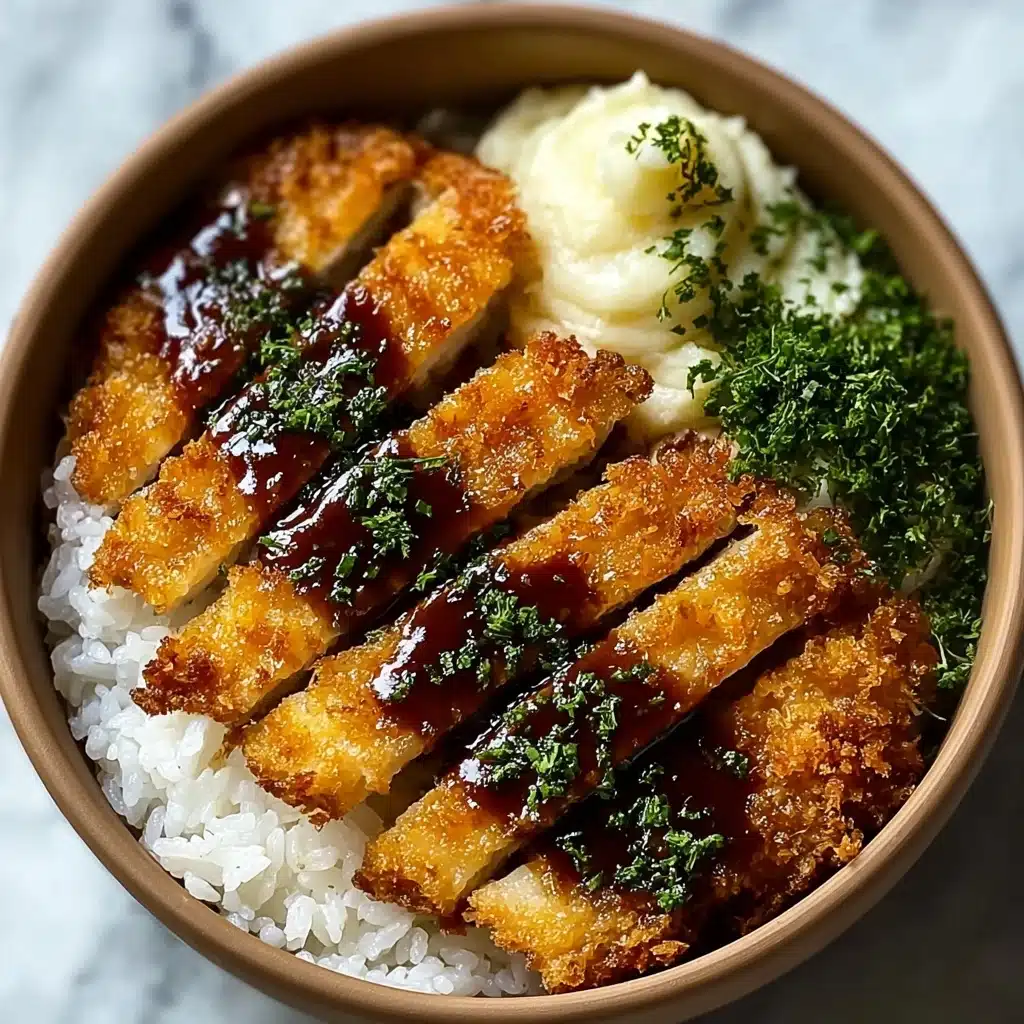
- Assemble the Bowls: Serve the seasoned rice in bowls or on plates. Slice the rested katsu into strips and arrange over the rice. Top with shredded cabbage, sliced green onions, and a sprinkle of sesame seeds. Drizzle generously with the homemade tonkatsu sauce and add pickled ginger on the side if desired for an extra zing.
Notes
- Pounding the chicken ensures even cooking and a tender texture.
- Using Japanese short-grain rice gives the authentic sticky and slightly sweet texture characteristic of katsu bowls.
- Feel free to substitute pork loin for chicken if preferred.
- Be careful not to lift the rice lid while cooking to retain steam.
- Use fresh panko breadcrumbs for extra crispiness.
- The homemade tonkatsu sauce can be substituted with store-bought for convenience.
- Prep Time: 20 minutes
- Cook Time: 30 minutes
- Category: Main Course
- Method: Frying, Simmering
- Cuisine: Japanese
Nutrition
- Serving Size: 1 bowl (approx. 1/2 recipe)
- Calories: 650 kcal
- Sugar: 9 g
- Sodium: 750 mg
- Fat: 25 g
- Saturated Fat: 4.5 g
- Unsaturated Fat: 18 g
- Trans Fat: 0.1 g
- Carbohydrates: 70 g
- Fiber: 3 g
- Protein: 35 g
- Cholesterol: 110 mg
Keywords: Japanese katsu bowl, chicken katsu, tonkatsu sauce, Japanese rice bowl, fried chicken, easy Japanese recipe, homemade katsu


