
Basil Garlic Aioli Recipe
If you’re searching for the ultimate creamy, flavor-packed sauce to elevate your next meal, look no further than this Basil Garlic Aioli Recipe. This vibrant green aioli is a dream come true for garlic lovers and herb enthusiasts alike, delivering a punch of fresh basil and mellowed garlic in every velvety spoonful. Whether you’re dunking fries, slathering sandwiches, or adding a dollop to grilled veggies, this aioli is that one secret weapon sauce that has everyone asking for seconds—and the recipe!
Ingredients You’ll Need
The magic of the Basil Garlic Aioli Recipe comes from its handful of simple, fresh ingredients—each one playing a major role in building the sauce’s tangy, bright, and aromatic personality. Welcome to your new favorite condiment!
- Fresh Basil: The star of the show, basil brings an unmistakable green fragrance and a bit of sweetness that sets this aioli apart.
- Garlic (minced): Go for fresh, hearty cloves—these provide the bold flavor backbone that makes this sauce sing.
- Egg Yolks: These create the luscious, creamy body of the aioli and help everything emulsify beautifully.
- Lemon Juice: Just a tablespoon adds essential brightness and a pop of acidity to balance all the flavors.
- Kosher Salt: Its gentle salinity heightens every aromatic and keeps the flavors from falling flat.
- Virgin Olive Oil: Use a good quality oil for richness and depth—you’ll taste the difference!
- Vegetable Oil: The mild base that gives aioli its signature silkiness without overpowering the basil and garlic.
How to Make Basil Garlic Aioli Recipe
Step 1: Combine the Flavor Essentials
Add the fresh basil leaves, minced garlic, egg yolks, lemon juice, and kosher salt to your food processor. These ingredients will form the fragrant heart of your Basil Garlic Aioli Recipe. Give them a few quick pulses until everything is just broken down and beautifully blended—the aroma at this stage is already irresistible!
Step 2: Emulsify the Oils
Now comes the transformation: with the processor running, slowly drizzle in the mixture of olive oil and vegetable oil. Emulsification is the secret that turns liquid into a thick, cloud-like aioli. Keep the pour steady and controlled for perfect texture. In about a minute, you’ll see the sauce start to come together magnificently.
Step 3: Scrape, Blend, and Perfection
Once your aioli thickens, turn off the processor and scrape down the sides to catch every bit of basil and garlic. Give it another brief blend to make sure everything is perfectly combined. The result: a gorgeous, lush green sauce bursting with flavor, ready for anything your imagination (or appetite) dreams up.
Step 4: Serve or Store
Transfer your finished Basil Garlic Aioli Recipe to an airtight container if not using right away. It’s ready to use immediately, but letting it chill for an hour or so lets the flavors meld for even more depth and complexity.
How to Serve Basil Garlic Aioli Recipe

Garnishes
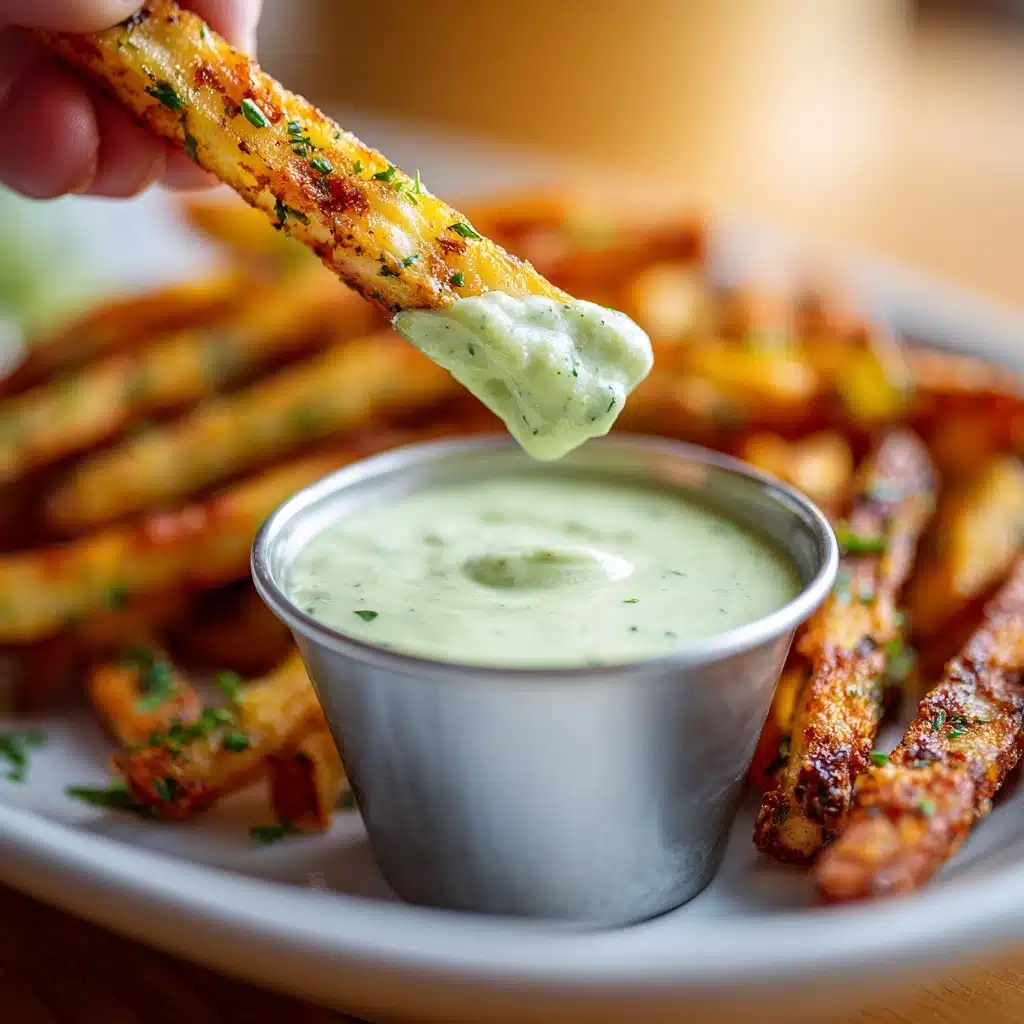
Bring a little extra style to the table by topping your aioli with a few finely sliced basil leaves or a tiny drizzle of olive oil. A light sprinkle of lemon zest or cracked black pepper adds both color and a fun, flavorful finish.
Side Dishes
This aioli is pure magic as a dip for crispy fries, roasted potatoes, or fresh vegetable crudités. It’s also stunning with grilled shrimp, fish, or simply as an upgrade atop burgers and sandwiches. Let the vibrant green hue and creamy richness serve as the unforgettable accent your favorite mains and sides have been missing.
Creative Ways to Present
Spoon the Basil Garlic Aioli Recipe into a small ramekin for a classic approach, or swirl it artfully on a plate beside proteins. For parties, serve in a hollowed bell pepper cup or even drizzle zig-zags across a platter of roasted veggies for a real wow moment!
Make Ahead and Storage
Storing Leftovers
The Basil Garlic Aioli Recipe will stay fresh and delicious for up to three days when stored in an airtight container in the refrigerator. Make sure to press a piece of plastic wrap directly onto the surface before sealing to help preserve its dreamy color and keep air out.
Freezing
While fresh aioli tastes best, you can freeze leftovers in a pinch. Transfer it to a freezer-safe jar, leaving some space at the top, and enjoy within a month. The texture might thin a bit once thawed, but a quick whisk brings it mostly back to life.
Reheating
Basil Garlic Aioli Recipe is best served chilled or at room temperature—no need to reheat. If it’s been refrigerated, let it sit out for 10–15 minutes before serving to regain its creamy, silky texture. Give it a good stir to reincorporate any separation.
FAQs
Can I make the Basil Garlic Aioli Recipe without a food processor?
Absolutely! A sturdy whisk and some patience will do the trick. Mince the garlic and basil as finely as possible, then whisk everything together in a bowl, adding the oils slowly while whisking constantly until thick and smooth.
Is it safe to use raw egg yolks in this recipe?
For most people, raw egg yolks are fine when sourced from fresh, high-quality eggs. If you’re concerned, seek out pasteurized eggs, which are widely available and safe for recipes like this aioli.
My aioli looks separated or too thin—what happened?
This usually means the oil was added too quickly or the mixture wasn’t emulsified enough. Make sure to pour the oil in slowly and let the processor or whisk create that all-important creamy bond. If needed, try blending in another egg yolk.
Can I use a different herb instead of basil?
Definitely! Try swapping in cilantro, parsley, or even tarragon for a new twist, though basil is really the soul of this version. Each herb will give its own distinct flavor profile and lovely color.
How spicy is the Basil Garlic Aioli Recipe?
The aioli itself isn’t spicy unless you use a particularly potent garlic. If you like a kick, consider adding a pinch of crushed red pepper flakes or a dash of hot sauce while blending.
Final Thoughts
There’s just something magical about making your own Basil Garlic Aioli Recipe at home. You get to savor those fresh flavors, wow your family and friends, and savor a sauce that truly outshines anything you can buy. Give this recipe a try, and let your taste buds have a little celebration in every bite!
Print
Basil Garlic Aioli Recipe
- Total Time: 10 minutes
- Yield: 1 cup
- Diet: Vegetarian
Description
This Basil Garlic Aioli recipe is a flavorful twist on the classic condiment. The fresh basil and garlic add a vibrant kick to the rich and creamy aioli, perfect for dipping or drizzling over your favorite dishes.
Ingredients
Fresh Basil:
4 tablespoons
Garlic:
1 tablespoon, minced (about 2-3 large cloves)
Egg Yolks:
2
Lemon Juice:
1 tablespoon
Kosher Salt:
1/2 teaspoon
Virgin Olive Oil:
1/4 cup
Vegetable Oil:
1/2 cup
Instructions
- Combine Ingredients: Place fresh basil, garlic, egg yolks, lemon juice, and kosher salt in a food processor. Pulse to combine.
- Emulsify Oils: With the processor on, slowly pour in the olive oil and vegetable oil mixture. Process until aioli forms, about a minute. Scrape the sides, process again until well combined.
- Serve or Store: Enjoy immediately or store the aioli in an airtight container in the refrigerator until ready to use. Makes approximately one cup.
- Prep Time: 10 minutes
- Category: Condiment
- Method: Food Processor
- Cuisine: Global
Nutrition
- Serving Size: 1 tablespoon
- Calories: 120
- Sugar: 0g
- Sodium: 120mg
- Fat: 13g
- Saturated Fat: 2g
- Unsaturated Fat: 10g
- Trans Fat: 0g
- Carbohydrates: 1g
- Fiber: 0g
- Protein: 1g
- Cholesterol: 35mg
Keywords: Basil Garlic Aioli, Aioli Recipe, Basil Aioli, Garlic Aioli

